SharePoint 2010 comes with several workflow templates
out of the box. These are generally installed as features, and are
available for you to associate with lists or at the site level. In
SharePoint 2007, you could only associate workflows with lists.
Therefore, step one of having a workflow available for use is for it to
be installed as a feature. Once it is available for use, you can then
create "Associations" of the workflow with existing lists or sites. At
this point, you can optionally ask the user associating the workflow
some questions, usually presented as an "Association Form". An
association form is what allows the workflow to interact with the user
when the workflow is first associated with a list.
Once you have created an association of a workflow
template, you can then choose to run the workflow on individual list
items (or run it on the site if you had chosen to associate it). When
you start a workflow, it can ask more questions by showing yet another
form called as the initiation form. Thus, the "initiation form" is what
allows the system to ask questions when a workflow is first
initiated/instantiated.
As the workflow is running, it can ask further
questions of the users. In asking those questions, the workflow can
create tasks for users, and those tasks can then be performed by the end
users. Those tasks go in a list, and can be represented as yet another
kind of form, called as the "Task Form". Note that a workflow can have
zero or one association forms, it can have zero or one initiation forms,
but it can have many task forms.
Similar to task forms, the workflow can also be
altered midcourse by end-users by using yet another kind of form called a
"Modification form". Just like the task form, there can be zero or many
modification forms on a workflow.
Let's pick an out of the box workflow and understand
the usage of all these forms and the workflow lifecycle in general. The
workflow I intend to use here is the "Approval" Workflow, which comes
out of the box in paid versions of SharePoint.
In your SharePoint site, go ahead and create a new
list based on the Custom List Template and name it "Items to be
Approved". Then visit the list settings page of this list and view the
versioning settings. Under versioning settings, choose to "require
content approval for submitted items". By choosing this option, you just
enabled the ability to have draft items available in the list. Draft
items mean items that are currently a work in progress and should not be
seen by everyone. They can be seen only by the author or by people who
have the ability to view and approve draft items. This is controlled by
the "manage lists" permission, which is one of the permission settings
that you can give any particular SPPrincipal. An SPPrincipal can be an
SPGroup or SPUser.
Next, back under lists settings visit the workflow
settings link. Here you will find the various workflow associations you
can create with this particular list. If you are using the enterprise
version of SharePoint, the various workflow associations available to
you are the following:
Disposition approval
Three state
Collect signatures
Approval
Collect feedback
For this example, you will use the approval workflow.
Therefore, select the approval workflow template and give it a name of
"Approval". Then, click the next button. Clicking the next buttonbrings
up the association form, which is an out of the box InfoPath form. If
you have used thisworkflow in SharePoint 2007, you would note that this
form has been redone. Fill out the form asshown in Figure 1.
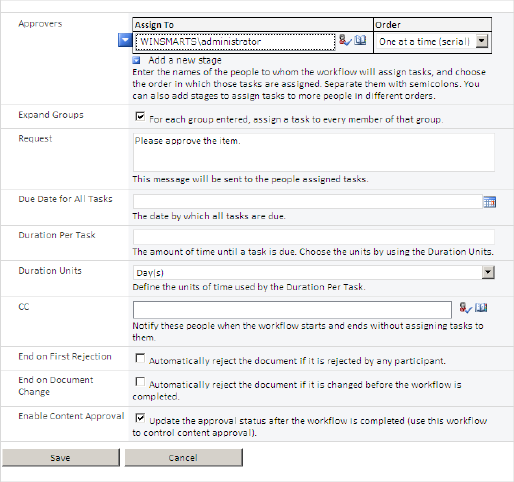
Notably, I have checked the check box for "Enable
Content Approval". This means that the completion of this workflow will
approve the associated list item that this workflow is running upon.
Once you've filled out the form, click the save button. You will then be
presented with a screen, as shown in Figure 2.
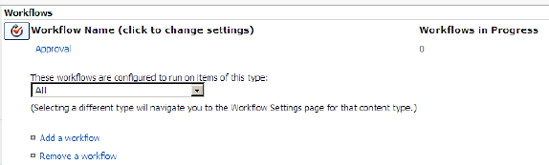
This screen informs you of all the associated
workflows with this particular list. If you have used workflows in
SharePoint 2007, you would note a notable difference here. Even within a
list, you now have the ability to configure to run a particular
workflow with a particular content type.
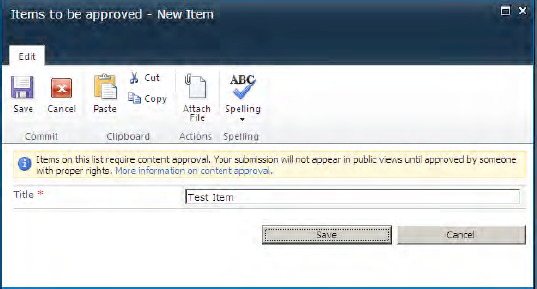
Now add an item into the list and put "Test Item" in
the Title. Note that SharePoint informs you that the items in this list
require content approval, and that your items will not appear in public
views, unless they are first approved by someone with proper rights.
This can be seen in the Figure 3.
Once you have created this item you would also note
that the default view now contains a column called "Approval Status" and
the approval status as of now is "Pending". Select the item and from
the ribbon under the items click the workflows button. Alternatively,
you can also choose to access the workflow screen from the ECB menu.
Click the approval workflow association that you had created earlier to
initiate the workflow. Initiating the workflow will present you with the
initiation form. This form can be seen in Figure 4.
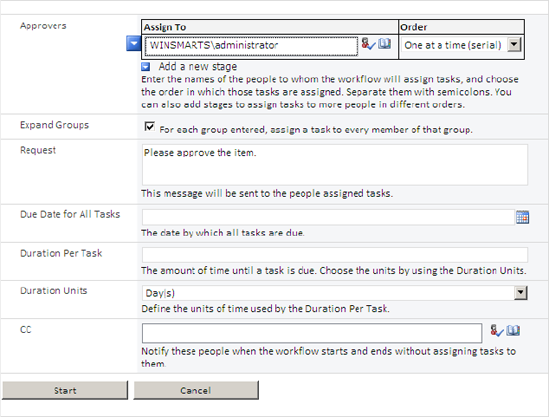
Click the start button to start the workflow. By
starting the workflow, the specified approver will be sent an e-mail
message, and a task will be created for them requesting to come and
approve the item. This task presents itself as yet another InfoPath form
and can be accessed directly from either their e-mail or from the
SharePoint site. In the SharePoint site, the task is created in a list
called "Tasks". You specified this list name right before association
form. There is another list you specified when creating this
association, called "Workflow History". This is a hidden list and will
store all the history activities of the running workflows.
Now visit the tasks list at
http://sp2010/Lists/Tasks, and you will see a task created for the
administrator. Clicking on this task brings up another form, which is
the task form. This can be seen in Figure 5.
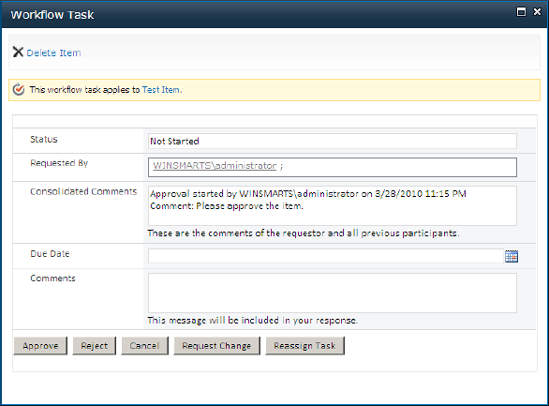
At this point, clicking on the request change or
reassigned task will bring up the necessary modification forms as well.
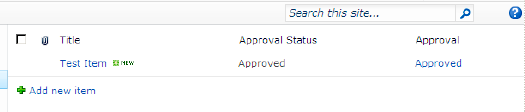
For now, go ahead and click the approve button and then visit the "items
to approve" list one more time. You would note that the item that the
workflow was running upon has now been approved. This can be seen in Figure 6.
Now, let me show you something really cool! Click the
"Approved" link under the "Approval" column. This should take you to a
page that informs you of the status of the current workflow. Assuming
that you have office web applications installed in the current site
collection you're working in, and you have activated the "SharePoint
Server Enterprise Site Collection features", and that Visio Services of
configured on your web application, you should see a graphical view of
the current workflow instance as shown in Figure 7.
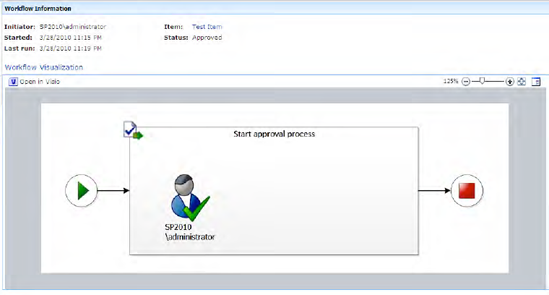
This is really amazing because it gives the user a
friendly graphical view of the current workflow instance with the
necessary values populated. On the same page, you would also see the
historical tasks, and the workflow history associated with this instance
of the workflow. This is information that most organizations would find
extremely helpful.
Now that Visio services picture was pretty cool!
Wouldn't it be helpful if end user's could also craft up a Visio diagram
to display their workflow, and perhaps that same visio diagram could be
used to give life to an actual running workflow in SharePoint 2010?
Exactly this scenario is possible.